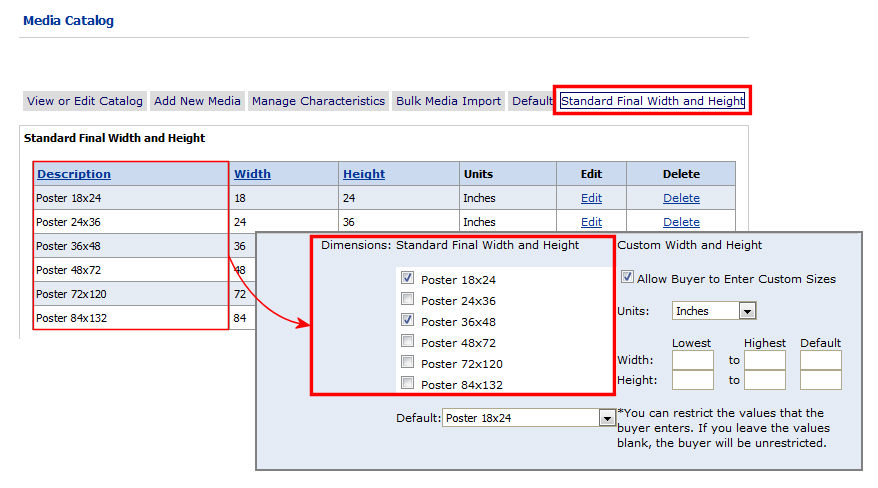
You can create standard width and height dimensions for printed products (i.e., does not apply to non-printed products). If the catalog item is so configured, buyers will then be presented with the pre-defined standard dimension/s and be enabled to enter a custom size (as configured) when ordering products.
Note that these settings are for the final size of a product, not necessarily the Media size. For example: a 10’ x 3’ banner and a 24” x 36” poster that may be printed on continuous Media.
Setting final width and height is for the convenience of both buyers and printers. It will cause buyers to be shown a pull-down list of standard size prints that the printer offers so they don't have to enter a Custom Width and Height. It lets printers limit options for a product to a standard set of size options.
Note on Finished Sizes: The finished
size of a product is the intended size of the product after it is "finished"
(i.e, after it has been printed and finished per buyer options). The buyer's
job may be printed on a larger size Media and, for example, trimmed to
accommodate bleeds on the finished size product. A poster with a finished
size of 12x18" can be printed on Super-B Media (13x19") and
then trimmed to the finished size.
Finished Size specs can come either
from buyers entering a custom width and height for a product (if you enable
this option on the Products > Settings page) or from the Print Shop
that provides buyers with standard final width and height options for
a product (by selecting from the available Media sizes on the Product
> Settings page as shown in the section below).
To set a Final Width and Height for printed products
1 On the Media Catalog > Standard Final Width and Height tab configure the final width and height using the fields below.

2 Units: Select the unit of measurement the standard width and height.
3 Description: Type a descriptive name for the standard final width and height setting.
Be clear in your description because buyers may see this description.
4 Width: Type the width (in the units selected above) for the standard Media size.
5 Height: Type the height (in the units selected above) for the standard Media size.
6 Click Add to save the dimension setting and make it available for associating with products.
To use the standard final width and height setting, you must associate any products that use the standard finished size with a ticket template that supports the Final Width and Height options (for more information, see To create (or edit) a ticket template. The finished sizes will then be available to select for a product on the Create Products | Settings page (for more information, see To create a product).
● To view Media in the catalog
● To manage Media characteristics
● To edit Media catalog entries
● To add Media catalog entries
● To remove Media from the catalog
● To perform a bulk Media import