On the Media Catalog > Add New Media tab complete or change the information:
Quick Reference:
How to Create Tab Media
Products
Media:
1. On the View or Edit Catalog
tab of the Media
page, define the Media
characteristics as appropriate and select Tab
Stock from the Media Type pull-down list.
2. Specify the number of tabs in the Tab
Count field. This will cause the tab definition panel to open.
3. Specify the dimensions of the tabs in the appropriate Tab
Measure fields.
Ticket Template:
1. On the Ticket Template page,
create or open a ticket template that you want to have a tab Media option.
2. In Section 2, click Add
Print Service(s).
3. Locate and select “Tabs.”
4. Click Add.
5. On the Tabs dialog, check the
box(es) to enable the tab Media.
6. Click Save to close the Tab(s)
dialog.
7. Click Save to save the ticket
template.
Result: Products based on the template
now have a tab Media
option on the storefront.
In the Media
Size field below: Be sure to accommodate the extra Media area needed for tabs.
For example, if you are setting up a tabbed Media
for documents that are US Letter (8.5x11"), you will need to allow
an extra .5 inches to accommodate the tabs. Thus the Media
size for a tabbed Media
intended for US Letter-size documents printed in portrait orientation
will be not 8.5x11" but 9x11".
Set up the ticket template for products
that will give buyers the option of adding tabbed pages to the documents
they are ordering:
Set up the ticket template that will be associated with the product with
a tabbed page option so that it includes both the tab Media
and the Tabs print service. For instructions on how to set up ticket templates,
see Define or Edit Ticket Templates.
1 Assign Media Characteristics—Use the options in the pull-down lists and text entry fields to define the Media’s size, color, weight, hole pattern, type, tab count, thickness.
● Description—Users view this description on the ticket page associated with products that use the Media.
● SKU—User-defined code. This is the reference code for the Media type transferred to a MicroPress or Fiery device.
SKU is used to identify the Media. Media must have a unique SKU or the import will not work correctly.
● Media Size—Select the size of Media.
● Media Color—Select the color of the Media.
● Media Weight—Select the weight of the Media.
● Media Hole Pattern—Select a hole pattern for the Media.
● Media Thickness—Specify the thickness of the Media (e.g., in micrometers).
● Media Type—Select a type for the Media.
● This Media Includes Tabs: Enable Media Tab Count.
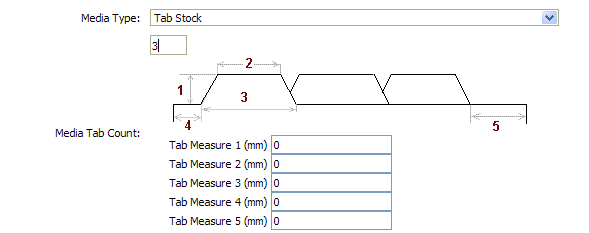
● Media Tab Count—To define a new tabbed Media, specify the number of tabs on the Media. This will cause the tab definition panel to open.
● Specify the dimensions of the tabs in the Tab Measure fields:
● Tab Measure 1: specifies the height of the tab (the length from the edge of the page to the leading edge of the tab).
● Tab Measure 2: specifies the length of the leading edge of the tab.
● Tab Measure 3: specifies the length of the tab's outdent (the distance between its two outdent endpoints).
● Tab Measure 4: specifies the distance from the top edge of the page to the first outdent of the tab.
● Tab Measure 5: specifies the distance from the bottom tab (last) tab on the page to the bottom edge of the page.
● Requires Additional Input: Enable the buyer to input additional information about the stock.

2 Configure MicroPress Ticket Integration—Indicates action required before or after printing jobs on an EFI MicroPress output device. For MicroPress 6.3.07 or above:
● Requires Preprint Action—Check this box to display a dialog to the operator to set up Media before printing. (Applies to MicroPress only.)
● Requires Postprint Action—Check this box if the feature you are adding requires postprint action on the part of an operator at the Print Shop. (Applies to MicroPress only.)
3 Define pricing for the Media on the available price sheets.
Warning: For complete information on pricing Media, see Price Sheets.
4 Click Save to apply your changes, or click Cancel to discard your changes.
● To view Media in the catalog
● To manage Media characteristics
● To edit Media catalog entries
● To remove Media from the catalog
● To perform a bulk Media import