 View
Media in the catalog
View
Media in the catalogFor an overview of Media management see Overview of Managing Media.

 View
Media in the catalog
View
Media in the catalogIf necessary click the Add New Media tab and add new Media entries.
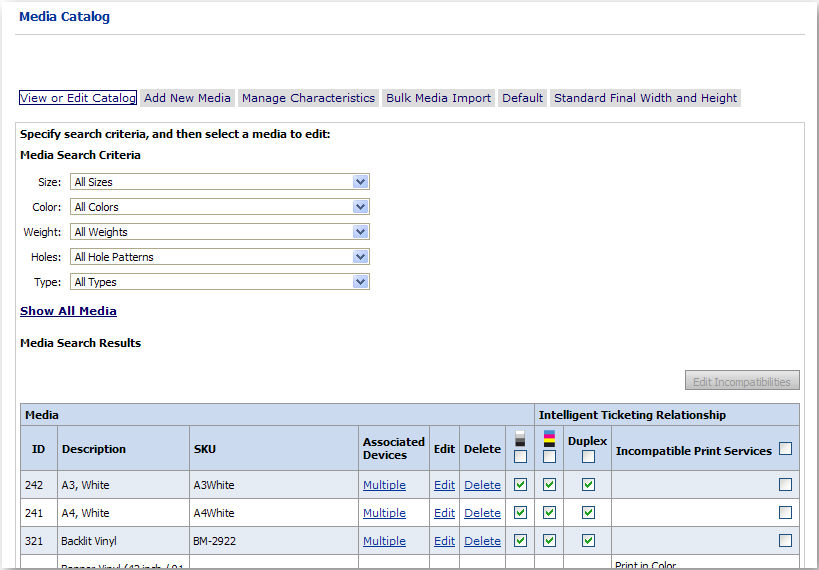
The initial table on the page (i.e., before you use the Media Search Criteria to filter the results) shows all available Media.
1 On the Media Catalog page > View or Edit Catalog tab, review the list of pre-installed Media and characteristics (size, weight, holes, color, and type) in the table to ensure that it has all of the Media on your list.

● Columns in the Media table:
● ID—The unique ID for the Media. These IDs can be used, for instance, in an MIS database to map Media between MarketDirect StoreFront and the MIS.
● Description—Users view this description on the ticket page associated with products that use the Media.
● SKU—User-defined code. This is the reference code for the Media type transferred to a MicroPress or Fiery device.
● Associated Devices—Displays the output devices associated with the Media. If more than one, click Multiple to open a read-only list of devices associated with the Media.
● Edit—Click Edit to the edit the Media specifications. Follow the instructions in the section To-edit Media, which covers how to edit an existing Media.
For instructions on how to add a new Media, see the topic Media Catalog-Add New Media.
● Delete—Click Delete to remove the Media from the catalog as described in the section To remove Media from the catalog below.
● Intelligent Ticketing Relationship—This conditional ticketing feature lets you establish incompatibility rules to specify that certain print services are incompatible (and thus not available for buyers to select when ordering products) based on the Media they select. For information on setting up intelligent ticketing, see Intelligent (Conditional) Ticketing.
2 Use the Media Search Criteria tools to display only Media of interest, or click Show All Media to display all Media in the system.

 Edit
Media
Edit
Media1 On the Media Catalog page > View or Edit Catalog tab, locate the Media you want to edit.
2 Click Edit.
The specifications for the selected Media
are now editable.

3 Edit the Media specification fields as needed:
● ID—(Read-Only): The unique ID for the Media. These IDs can be used, for instance, in an MIS database to map Media between MarketDirect StoreFront and the MIS.
● Description—Users view this description on the ticket page associated with products that use the Media.
● SKU—User-defined code. This is the reference code for the Media type transferred to a MicroPress or Fiery device.
SKU is used to identify the Media. Media must have a unique SKU or the import will not work correctly.
● Media Size—Select the size of Media.
● Media Color—Select the color of the Media.
● Media Weight—Select the weight of the Media.
● Media Hole Pattern—Select a hole pattern for the Media.
● Media Type—Select a type for the Media.
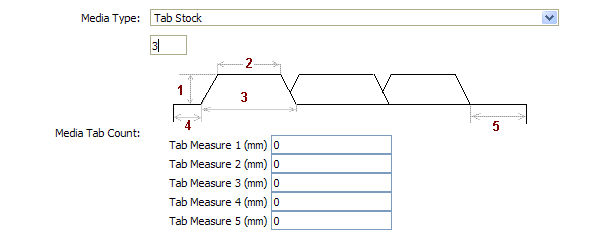
● Media Tab Count—Specify the number of tabs on the Media. This will cause the tab definition panel to open:

● Specify the dimensions of tab in the Tab Measure fields:
● Tab Measure 1: specifies the height of the tab (the length from the edge of the page to the leading edge of the tab).
● Tab Measure 2: specifies the length of the leading edge of the tab.
● Tab Measure 3: specifies the length of the tab's outdent (the distance between its two outdent endpoints).
● Tab Measure 4: specifies the distance from the top edge of the page to the first outdent of the tab.
● Tab Measure 5: specifies the distance from the bottom tab (last) tab on the page to the bottom edge of the page.
● Media Thickness—Specify the thickness of the Media (e.g., in mircometers).
2 Configure MicroPress Ticket Integration—Indicates action required before or after printing jobs on an EFI MicroPress output device. For MicroPress 6.3.07 or above:
● Requires Preprint Action—Check this box to display a dialog to the operator to set up Media before printing. (Applies to MicroPress only.)
● Requires Postprint Action—Check this box if the feature you are adding requires postprint action on the part of an operator at the Print Shop. (Applies to MicroPress only.)
3 Define pricing for the Media on the available price sheets.
Warning: For complete information on pricing Media, see Price Sheets.
4 Click Save to apply your changes, or click Cancel to discard your changes.

 Remove
Media from the catalog
Remove
Media from the catalog1 On the Media Catalog page | View or Edit Catalog tab, locate the Media you want to remove from the catalog.
Removing a Media will deactivate it, but it will continue to be used for jobs in production, reorders, and in existing ticket templates that use it.
2 Click Delete at the far right-hand side of the row containing the Media.

 Set
up intelligent ticketing rules for Media
Set
up intelligent ticketing rules for MediaIntelligent (conditional) ticketing functionality is also available on the Print Services page. There you can establish incompatibility rules between specified Media and print services. For more information, see Intelligent (Conditional) Ticketing.
Intelligent (or conditional) ticketing was designed to simplify the ticketing process for buyers by preventing impossible or illogical options when ordering products. Intelligent ticketing lets you specify incompatibility rules to prevent buyers from being able to select print services that are not compatible with their Media choice. Buyers are alerted that a particular option is not available based on a previous choice they have made in defining the product. You can define "rules" that make a particular Media (Media type or individual Media) incompatible with an individual print service(s) or an entire print service category.
For instance, with intelligent ticketing you can prevent buyers from ordering duplex printing on transparent stock or duplex printing on 20# stock. Another common use case for intelligent ticketing would be defining a rule specifying that the color printing print service is incompatible with color Media. This will save customers time and streamline the product ordering process.
Please note that intelligent (conditional) ticketing rules are not supported presently with FusionPro VDP products that use the HTML ticket.
1 On the Media Catalog page, select the Media type or individual Media for which you want to specify intelligent ticketing.

Three print services—Black and White printing, Color Mode printing, and Duplex printing—are included on the Media table for convenience. By default all are checked (meaning they are compatible with the Media). Unchecking these print services will make a rule specifying them as incompatible with the Media.
2 To make one or more print services incompatible with the selected Media, do the following:
● To select an individual Media in the category, check the box in the Incompatible Print Services column on the row that contains the Media.
● To select all print services in the Media type, check the box in the Incompatible Print Services column on the title row.
Selecting one or more Media will enable the Edit Incompatibilities button.
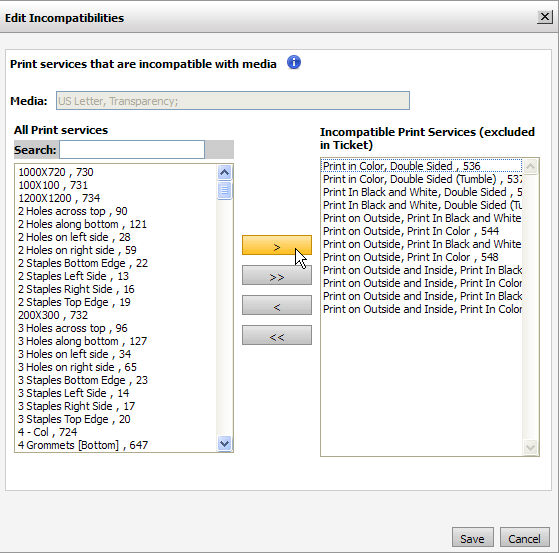
● Click Edit Incompatibilities.
● On
the Edit Incompatibilities dialog, select the print service(s) from
the All Print Services list
and then click  to add to the Incompatible
Print Services (excluded in Ticket) list.

● Click Save.
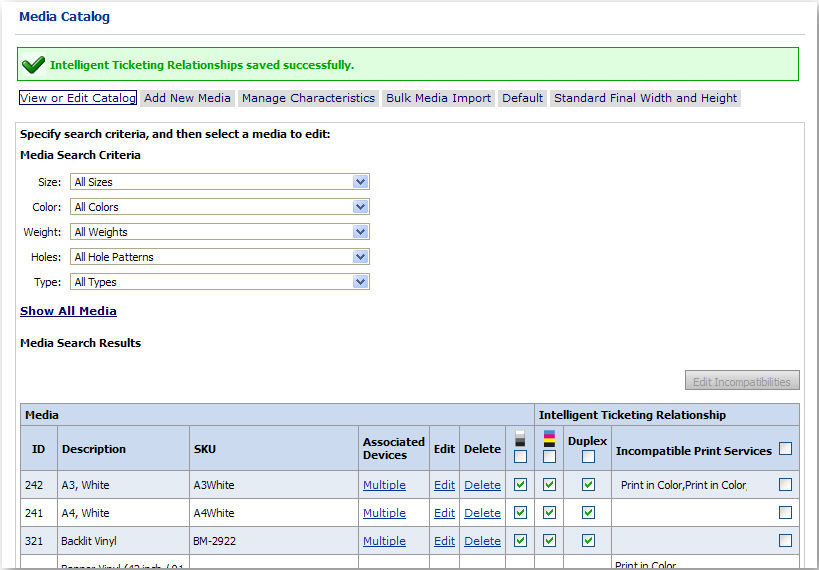
An "Intelligent Ticketing
Relationships saved successfully" message will be displayed.
The Incompatible Print Services
field on the Media
Catalog page will show the category(ies) that you specified as incompatible
with the selected Media.

3 Click Save.

 Remove
an intelligent ticketing relationship incompatibility rule
Remove
an intelligent ticketing relationship incompatibility rule1 On the Media Catalog page, click the checkbox in the Incompatible Print Services column on the row(s) of all Media with rules you want to remove.
2 To
remove all rules for the selected Media,
click Clear Ticketing Rules
to (you will be asked to confirm your choice).
OR
To remove some of the rules for the selected Media,
click Edit
Incompatibilities to open
the Edit Incompatibilities dialog:
● Select
the print service(s) (by Ctrl-clicking) you want to remove in the
Incompatible Print Services (excluded
in Ticket) list and then click  to add to
the All Print Services list.
To select all print services in
the Incompatible Print Services (excluded
in Ticket), click  .
.
● Click Save.
3 Click Save.
● To manage Media characteristics
● To add Media catalog entries
● To perform a bulk Media import