
 Built-in
Sales Tax Model
The built-in sales tax model is the standard tax implementation in the United States whereby tax is assessed at the order level (based on the order amount). Follow the steps in this section to configure your Sales Tax settings.
1. To enable the built-in sales tax model
1 Go to Administration > Taxes.
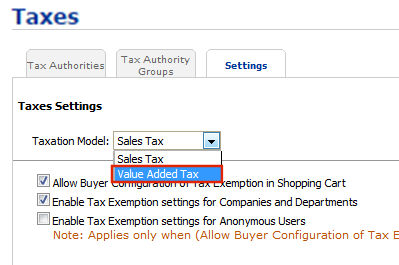
2 From the Taxation Model pull-down list, select Sales Tax.
To use the sales tax model, make sure the Enable External Tax Integration is not selected.
3 Click Save.
2. To configure tax settings for the built-in sales tax model
1 Go to Administration > Taxes.
2 Open the Settings tab.
3 In the Taxes Settings section:
● Allow Buyer Configuration of Tax Exemption in Shopping Cart: Select this option to give buyers the option of designating each line item in the shopping cart as Tax Exempt.

This Tax
Exempt check-box will be enabled only under following conditions:
- If the Anonymous user has a tax exemption claim
- If the Registered User’s Company or Department has a tax exemption
claim
- If the particular product is exempted from tax
● Enable Tax Exemption Settings for Companies and Departments (default): When this option is selected, the tax exemption settings in Manage Companies and Manage Departments will be available.
● Enable Tax Exemption Settings for Anonymous Users: When this option is selected, anonymous users in MarketDirect StoreFront will get a prompt in the Shopping Cart to claim tax exemption.
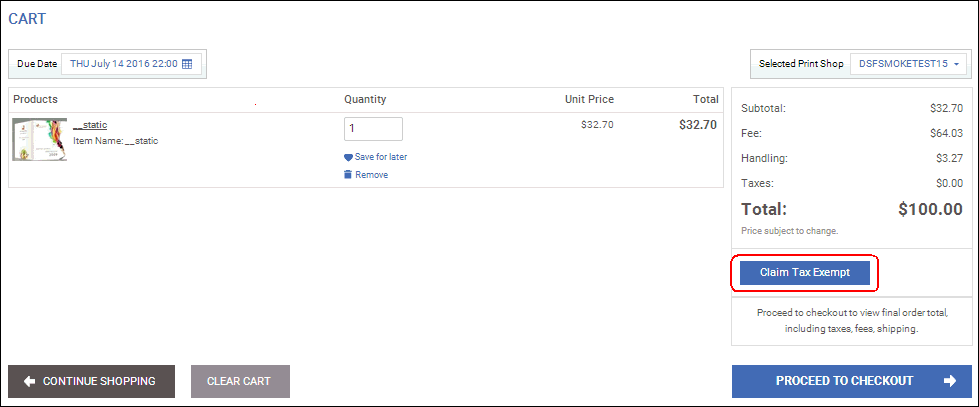
During order checkout, the anonymous user will be required to login. Once logged in, the tax exemption status of the anonymous user (based on whether s/he clicked and provided details in the Claim Tax Exempt link) will be transferred to the logged in user. The logged in user then gets the same tax exemption status for all orders placed.
When anonymous user claims tax exempt and the order becomes tax free, the operator can override this in the Quote Editor by changing the tax exempt status of the order. The Order Summary Page lets operators view an anonymous user’s tax exemption claim and view the uploaded certificate (PDF).
3. To configure Tax Authorities for the built-in sales tax model
● Click here to set up Tax Authorities.
4. To configure Tax Authority Groups for the built-in sales tax model
External Tax Integration:

 CCH
SureTax
 MarketDirect StoreFront enables integration with CCH SureTax through the External Tax Connector. CCH SureTax will calculate the tax based on the details of the order, such as order gross amount, products, and the local tax governing authorities for the shipping origin and destination.
● You must establish a merchant account with CCH SureTax before you attempt to integrate with MarketDirect StoreFront.
Contact Wolters Kluwer CCH customer support for information on establishing a new CCH SureTax account or migrating your existing CCH Sales Tax Online account to SureTax.Kristine M. Eberhart, Partner Manager, Tax and Accounting North America, Corporate Indirect
612.760.7821
kristine.eberhart@wolterskluwer.comMarketDirect StoreFront Technical Support does not provide support for CCH SureTax. For any problems or questions regarding your CCH SureTax account please contact your account manager or Wolters Kluwer CCH customer support:
● Through the CCH Support link (on the Support page in your CCH merchant account site), or
● https://support.cch.com/productsupport/
All taxation information is collected and monitored in the CCH web site.To set up CCH SureTax using the External Tax Connector:
1 Go to Administration > Taxes.
2 Select the Settings tab on the Taxes page.
3 Choose Sales Tax from the Taxation Model drop-down list.
4 Enable tax settings (optional):

● Allow Buyer Configuration of Tax Exemption in Shopping Cart: Select this option to give buyers the option of designating each line item in the shopping cart as Tax Exempt.

This Tax Exempt check-box will be enabled only under following conditions:
- If the Anonymous user has a tax exemption claim.
- If the Registered User’s Company or Department has a tax exemption claim.
- If the particular product is exempted from tax.● Enable Tax Exemption Settings for Companies and Departments (default): When this option is selected, the tax exemption settings in Manage Companies and Manage Departments will be available.
● Enable Tax Exemption Settings for Anonymous Users: When this option is selected, anonymous users in MarketDirect StoreFront will get a prompt in the Shopping Cart to claim tax exemption.

During order checkout, the anonymous user will be required to login. Once logged in, the tax exemption status of the anonymous user (based on whether s/he clicked and provided details in the Claim Tax Exempt link) will be transferred to the logged in user. The logged in user then gets the same tax exemption status for all orders placed.
When anonymous user claims tax exempt and the order becomes tax free, the operator can override this in the Quote Editor by changing the tax exempt status of the order. The Order Summary Page lets operators view an anonymous user’s tax exemption claim and view the uploaded certificate (PDF).
5 Click the Enable External Tax Integration check-box.
6 Select the Use TaxConnector radio button.
7 Choose CCH SureTax from the Choose a Tax Service drop-down list.
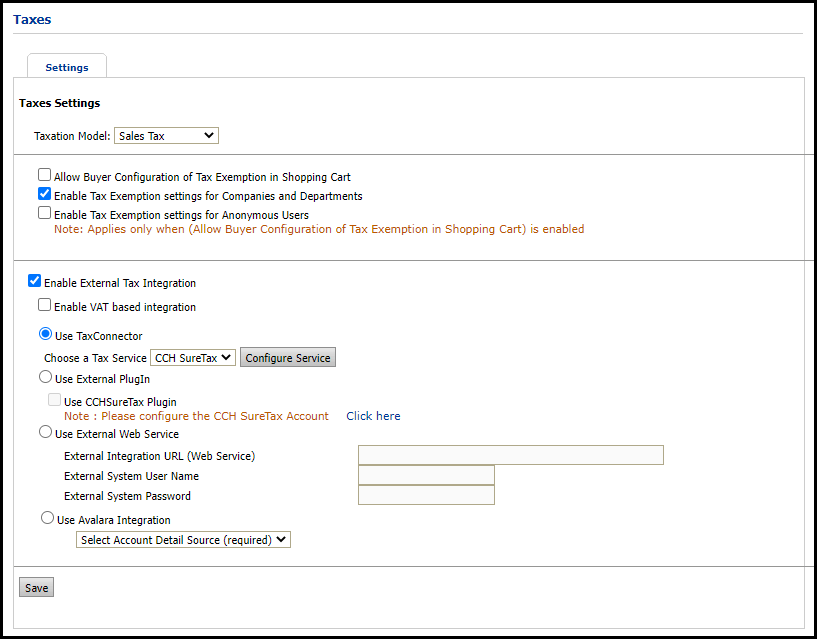
8 Click the Configure Service button to open the Configure Service page.
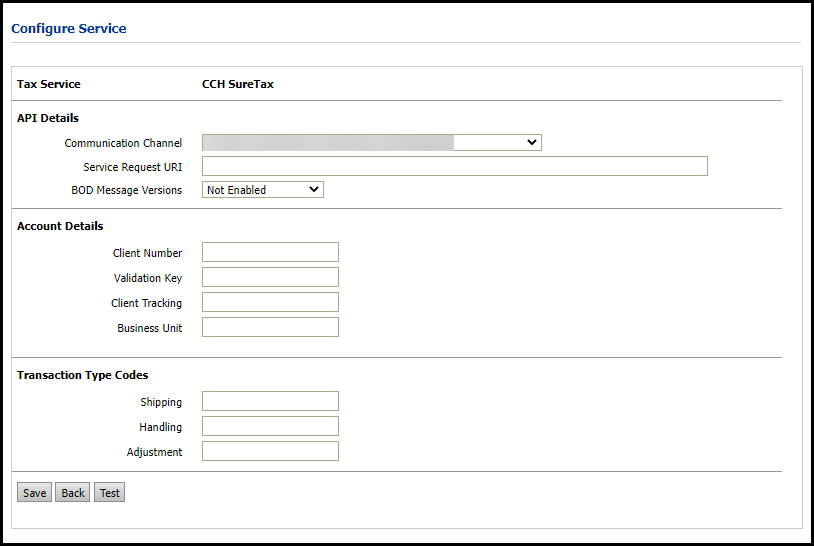
Tax service credentials (Service Request URL, Account Details, and Transaction Type Codes) will be provided by CCH SureTax.
9 Choose the appropriate Communication Channel from the drop-down list.
The drop-down list defaults to the first eFlow channel found.
10 Enter the appropriate Service Request URL.
11 Choose BOD Message Version 4 from the BOD Message Versions drop-down list.
12 Enter your tax service Account Details:
● Client Number
● Validation Key
● Client Tracking
● Business Unit
13 Enter any specific Transaction Type Codes (optional):
● Shipping
● Handling
● Adjustment
14 Click Save on the Configure Service page.
15 Click Back and then click Save on the Tax Settings page.

 Thomson
Reuters OneSource
Thomson
Reuters OneSourceMarketDirect StoreFront enables integration with Thomson Reuters OneSource through the External Tax Connector. Thomson Reuters OneSource will calculate the tax based on the details of the order, such as order gross amount, products, and the local tax governing authorities for the shipping origin and destination.
● You must establish a merchant account with Thomson Reuters OneSource before you attempt to integrate with MarketDirect StoreFront. To learn more about setting up an Thomas Reuters OneSource account, visit https://tax.thomsonreuters.com/en/onesource or call 1-888-885-0206.
MarketDirect StoreFront Technical Support does not provide support for Thomson Reuters OneSource. For any problems or questions regarding your Thomson Reuters OneSource account, you can contact OneSource customer support at https://tax.thomsonreuters.com/en/onesource/support.
All taxation information is collected and monitored in the OneSource web site.To set up Thomson Reuters OneSource using the External Tax Connector:
1 Go to Administration > Taxes.
2 Select the Settings tab on the Taxes page.
3 Choose Sales Tax from the Taxation Model drop-down list.
4 Enable tax settings (optional):

● Allow Buyer Configuration of Tax Exemption in Shopping Cart: Select this option to give buyers the option of designating each line item in the shopping cart as Tax Exempt.

This Tax Exempt check-box will be enabled only under following conditions:
- If the Anonymous user has a tax exemption claim.
- If the Registered User’s Company or Department has a tax exemption claim.
- If the particular product is exempted from tax.● Enable Tax Exemption Settings for Companies and Departments (default): When this option is selected, the tax exemption settings in Manage Companies and Manage Departments will be available.
● Enable Tax Exemption Settings for Anonymous Users: When this option is selected, anonymous users in MarketDirect StoreFront will get a prompt in the Shopping Cart to claim tax exemption.

During order checkout, the anonymous user will be required to login. Once logged in, the tax exemption status of the anonymous user (based on whether s/he clicked and provided details in the Claim Tax Exempt link) will be transferred to the logged in user. The logged in user then gets the same tax exemption status for all orders placed.
When anonymous user claims tax exempt and the order becomes tax free, the operator can override this in the Quote Editor by changing the tax exempt status of the order. The Order Summary Page lets operators view an anonymous user’s tax exemption claim and view the uploaded certificate (PDF).
5 Click the Enable External Tax Integration check-box.
6 Select the Use TaxConnector radio button.
7 Choose OneSource from the Choose a Tax Service drop-down list.
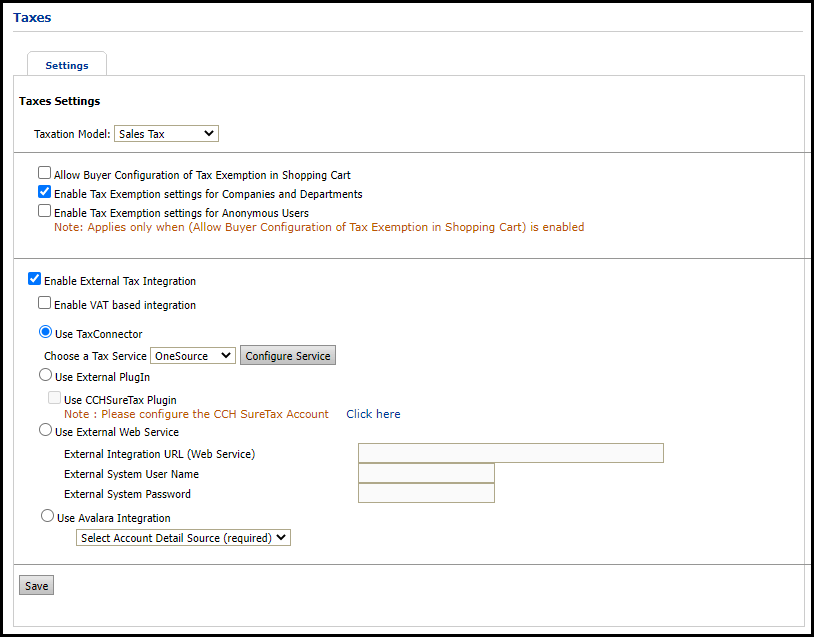
8 Click the Configure Service button to open the Configure Service page.
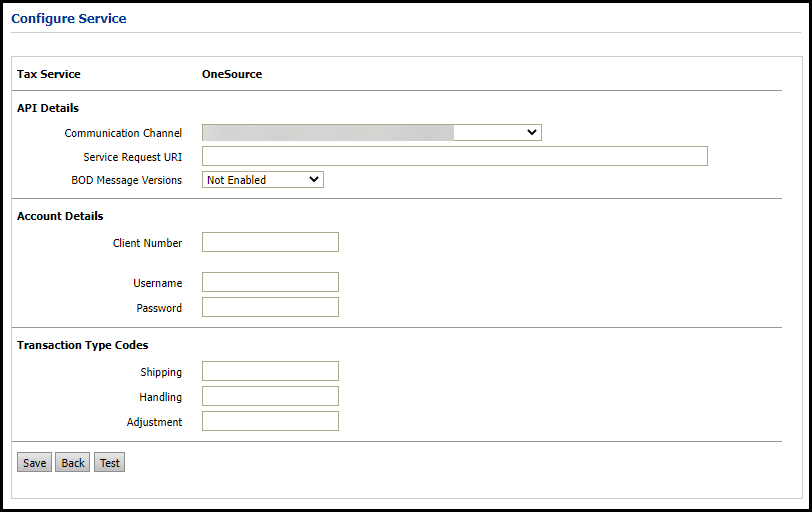
Tax service credentials (Service Request URL, Account Details, and Transaction Type Codes) will be provided by Thomson Reuters OneSource.
9 Choose the appropriate Communication Channel from the drop-down list.
The drop-down list defaults to the first eFlow channel found.
10 Enter the appropriate Service Request URL.
11 Choose BOD Message Version 4 from the BOD Message Versions drop-down list.
12 Enter your tax service Account Details:
● Client Number
● Username
● Password
13 Enter any specific Transaction Type Codes (optional):
● Shipping
● Handling
● Adjustment
14 Click Save on the Configure Service page.
15 Click Back and then click Save on the Tax Settings page.

 Vertex
MarketDirect StoreFront enables integration with Vertex through the External Tax Connector. Vertex will calculate the tax based on the details of the order, such as order gross amount, products, and the local tax governing authorities for the shipping origin and destination.
● You must establish a merchant account with Vertex before you attempt to integrate with MarketDirect StoreFront.
MarketDirect StoreFront Technical Support does not provide support for Vertex. For any problems or questions regarding your Vertex account, you can contact Vertex customer support at https://www.vertexinc.com/support-services/taxamo-customer-support.
All taxation information is collected and monitored in the Vertex web site.To set up Vertex using the External Tax Connector:
1 Go to Administration > Taxes.
2 Select the Settings tab on the Taxes page.
3 Choose Sales Tax from the Taxation Model drop-down list.
4 Enable tax settings (optional):

● Allow Buyer Configuration of Tax Exemption in Shopping Cart: Select this option to give buyers the option of designating each line item in the shopping cart as Tax Exempt.

This Tax Exempt check-box will be enabled only under following conditions:
- If the Anonymous user has a tax exemption claim.
- If the Registered User’s Company or Department has a tax exemption claim.
- If the particular product is exempted from tax.● Enable Tax Exemption Settings for Companies and Departments (default): When this option is selected, the tax exemption settings in Manage Companies and Manage Departments will be available.
● Enable Tax Exemption Settings for Anonymous Users: When this option is selected, anonymous users in MarketDirect StoreFront will get a prompt in the Shopping Cart to claim tax exemption.

During order checkout, the anonymous user will be required to login. Once logged in, the tax exemption status of the anonymous user (based on whether s/he clicked and provided details in the Claim Tax Exempt link) will be transferred to the logged in user. The logged in user then gets the same tax exemption status for all orders placed.
When anonymous user claims tax exempt and the order becomes tax free, the operator can override this in the Quote Editor by changing the tax exempt status of the order. The Order Summary Page lets operators view an anonymous user’s tax exemption claim and view the uploaded certificate (PDF).
5 Click the Enable External Tax Integration check-box.
6 Select the Use TaxConnector radio button.
7 Choose Vertex from the Choose a Tax Service drop-down list.
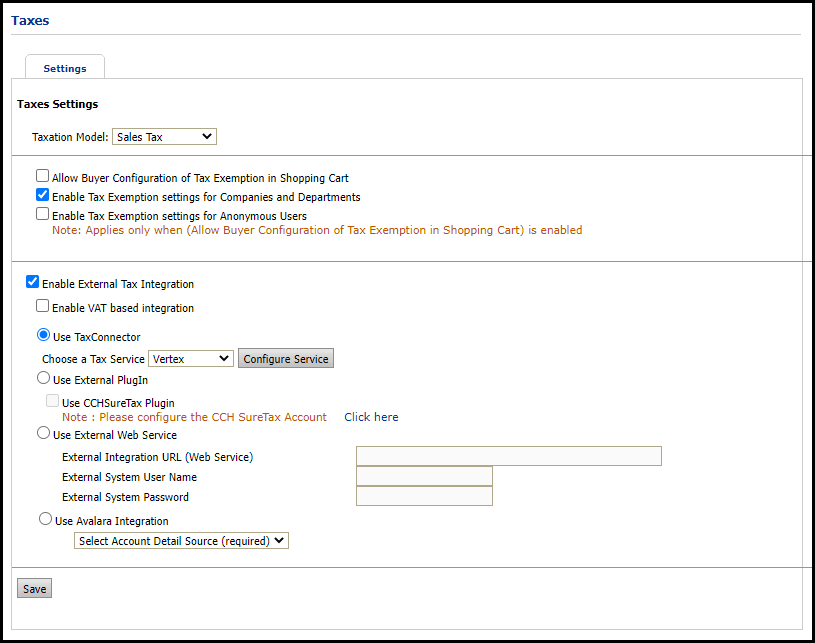
8 Click the Configure Service button to open the Configure Service page.
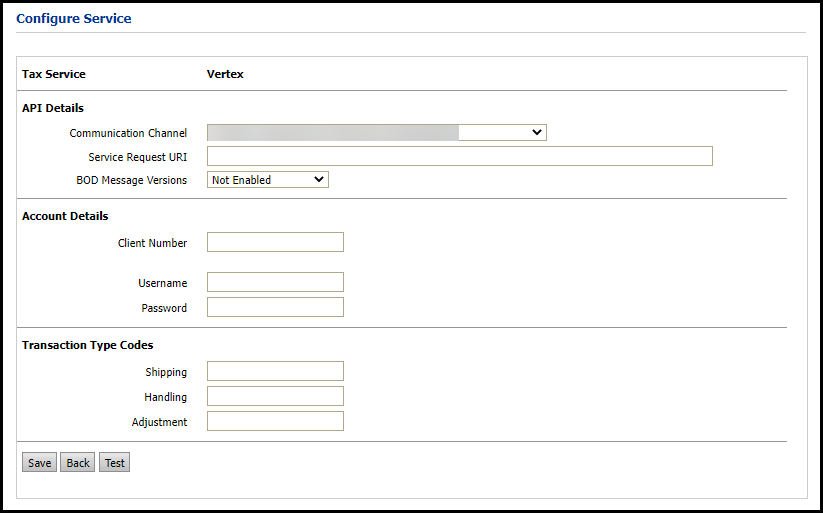
Tax service credentials (Service Request URL, Account Details, and Transaction Type Codes) will be provided by Vertex.
9 Choose the appropriate Communication Channel from the drop-down list.
The drop-down list defaults to the first eFlow channel found.
10 Enter the appropriate Service Request URL.
11 Choose BOD Message Version 4 from the BOD Message Versions drop-down list.
12 Enter your tax service Account Details:
● Client Number
● Username
● Password
13 Enter any specific Transaction Type Codes (optional):
● Shipping
● Handling
● Adjustment
14 Click Save on the Configure Service page.
15 Click Back and then click Save on the Tax Settings page.

 Avalara
MarketDirect StoreFront enables integration with Avalara, which will calculate the tax based on the details of the order, such as order gross amount, products, and the local tax governing authorities for the shipping origin and destination.
● You must establish a merchant account with Avalara before you attempt to integrate with MarketDirect StoreFront.
MarketDirect StoreFront Technical Support does not provide support for Avalara. For any problems or questions regarding your Avalara account, you can contact Avalara customer support at https://www.avalara.com/for-review-only/en/archive/support.html.
All taxation information is collected and monitored in the Avalara web site.To set up Avalara using the External Tax Connector:
1 Go to Administration > Taxes.
2 Select the Settings tab on the Taxes page.
3 Choose Sales Tax from the Taxation Model drop-down list.
4 Enable tax settings (optional):

● Allow Buyer Configuration of Tax Exemption in Shopping Cart: Select this option to give buyers the option of designating each line item in the shopping cart as Tax Exempt.

This Tax Exempt check-box will be enabled only under following conditions:
- If the Anonymous user has a tax exemption claim.
- If the Registered User’s Company or Department has a tax exemption claim.
- If the particular product is exempted from tax.● Enable Tax Exemption Settings for Companies and Departments (default): When this option is selected, the tax exemption settings in Manage Companies and Manage Departments will be available.
● Enable Tax Exemption Settings for Anonymous Users: When this option is selected, anonymous users in MarketDirect StoreFront will get a prompt in the Shopping Cart to claim tax exemption.

During order checkout, the anonymous user will be required to login. Once logged in, the tax exemption status of the anonymous user (based on whether s/he clicked and provided details in the Claim Tax Exempt link) will be transferred to the logged in user. The logged in user then gets the same tax exemption status for all orders placed.
When anonymous user claims tax exempt and the order becomes tax free, the operator can override this in the Quote Editor by changing the tax exempt status of the order. The Order Summary Page lets operators view an anonymous user’s tax exemption claim and view the uploaded certificate (PDF).
5 Click the Enable External Tax Integration check-box.
6 Select the Use Avalara Integration radio button.
7 Choose Specify Account Details from the Specify Account Details Source drop-down list.
The Use Predefined Settings From Parent Organization option is only available for administrators with an entity license. This option allows the entity to use the same settings as the parent entity.
8 Enter your tax service Account Details:
Tax service Account Details will be provided by Avalara.
Account ID
License Key
Item Code (General)
Item Code (Order Discount)
Item Code (Order Fee)
Item Code (Handling)
Item Code (Shipping)
Company Code
Administrators can use the Lookup button to choose another company for their Avalara integration.
The administrator must enter the exact Item Code name from Avalara into the correct Item Code field in MarketDirect StoreFront. The Item Code fields in MarketDirect StoreFront are mandatory. For more information on Item Codes, please contact Avalara support.
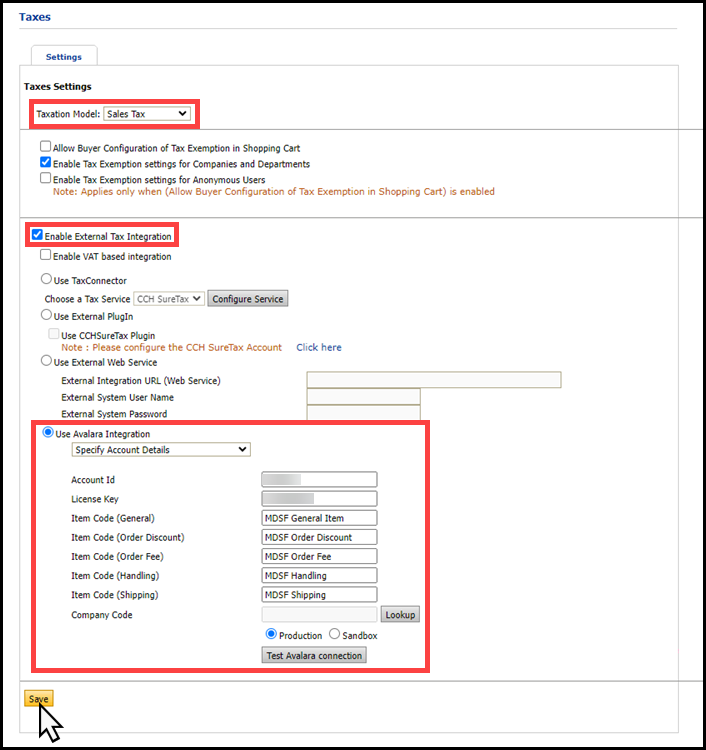
9 Click Save.
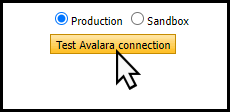
Administrators can test the integration connection on a Production and/or Sandbox site by selecting the appropriate radio button and then clicking the Test Avalara connection button.


 to save
and add another country/number pair.





 to
edit a delivery method.
