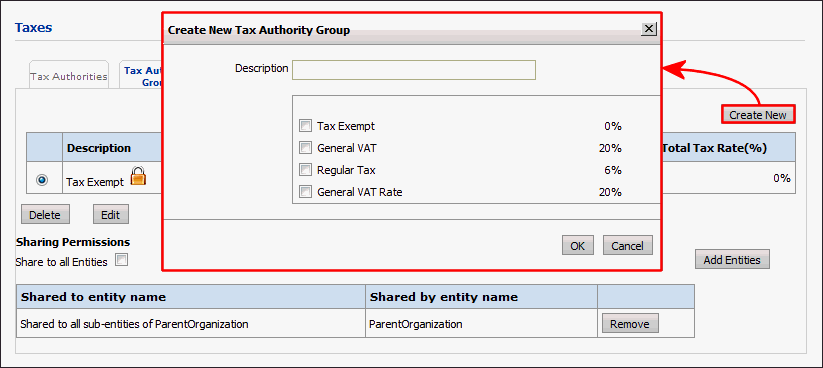
The Tax Authority Groups page is where you will specify valid configurations of specific tax authorities, such as state and local taxes that are to be used together. All orders are assigned a particular tax authority group, ensuring that each order has a valid combination of taxes. Additionally, each Print Shop is assigned a tax authority group to use for all incoming jobs. These can be overridden in the Quote Editor for each order.
Each tax authority group is a valid configuration of tax authorities.
An example: A Print Shop must collect taxes at three levels (i.e., three tax authorities): (1) a city sales tax, (2) a county sales tax, and (3) a state sales tax. Creating a tax authority group that includes the three taxes and specifying it as the default tax group on the Print Shop configuration page ensures that all applicable taxes are collected from the buyer. Thus, a tax authority group is a collection of tax authorities that are to be used together (i.e., those that levy taxes for a particular Print Shop).
1 In the tax authority list view: Go to Administration > Taxes.
2 Open the Tax Authority Groups tab.
3 Click Create
New.

4 On the Create New Tax Authority Group dialog, enter the following information for the new tax authority group:
● Description—a name that identifies this tax for reporting. This may be displayed to buyers on the storefront, including operators who may reassign an order’s tax authority group.
● Applicable Taxes—A list the descriptions and tax rates of all known tax authorities are displayed. Select the ones that should be levied for the tax authority group.
5 Click OK to create the tax authority group. It will appear in the tax authority group list
The system ships with a “Tax Exempt” tax authority group that is assigned a zero tax rate. If your site requires tracking additional taxes with either zero tax rates or tax-exempt status, feel free the define your own authority groups as needed.
To modify properties of existing tax authority groups
1 In the tax authority list view: Go to Administration > Taxes.
2 On the Tax Authorities tab, select the tax authority group to edit.
3 Click Edit.
4 Modify the properties as needed then click Save. (The Cancel button reverts to the information in the database before the edit was started.)
To delete tax authority groups
Tax authority groups can be deleted (using the Delete button in the lower-left of the Tax Authority Groups tab) as long as these conditions are met:
● No Print Shop is assigned to use the tax authority group, either automatically or manually.
● The tax authority group is not the “Tax Exempt” group that ships with the system.
● To create a new tax authority
● To modify properties of existing tax authorities
● To configure built-in tax settings
● To set up a merchant account with an external tax service provider
● To integrate MarketDirect StoreFront with an external tax system